
Compassionate Care, Ongoing Guidance
At Advanced Dental Sleep Treatment Center, we understand that your treatment plan doesn’t stop when you leave the office, and neither should the support we provide in helping you achieve quality, restful sleep. That’s why we offer resources to help you navigate your sleep apnea or snoring treatment. From Patient Education articles to detailed instructions on how to complete your take-home sleep test, we are here to make sure you feel supported.
If you have questions regarding your treatment plan, financing options, or scheduling, please don’t hesitate to call our office at (402) 493-4175. We’re here to help!
FAQs
We recommend cleaning your oral appliance daily using foaming soap (e.g. Method foaming soap), a soft-bristled toothbrush, and cold water. Depending on your particular appliance, we also may recommend soaking it in a cleaner during the day. If you have pets, please be sure to keep your appliance in a closed container so they aren’t able to get to it!
Wait at least 30 minutes before using the aligner.
*That time of normal functioning (chewing, speaking, swallowing) will help relax your jaw.
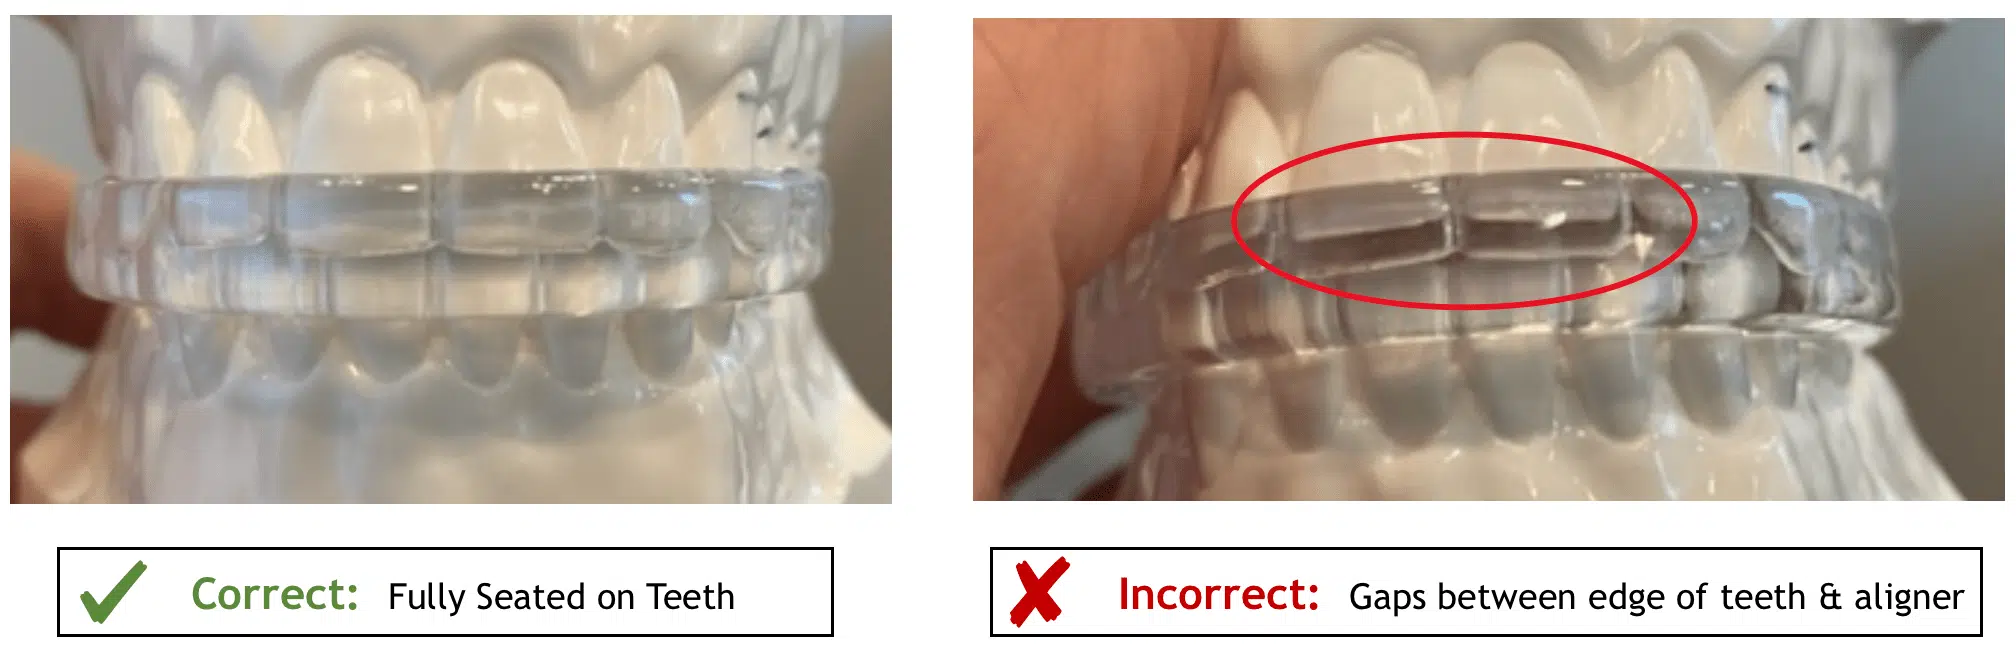
Placing the Aligner
As you are watching in a mirror, you will place the aligner on your lower front teeth and slowly close into it. You are watching to verify that the edges of your upper teeth are fully into place. If there is any gapping from the edge of your teeth to the imprint in the aligner, you will put it away and try it a few hours later.
- If you cannot get into the aligner by the end of the day, leave your appliance out that night if you feel comfortable doing so, and call us in the morning.
- Failure to follow these instructions may result in a bite change that could require orthodontics or even surgery at additional charge to you.
The reason we do Home Sleep Tests is to make sure your custom oral appliance is controlling your apnea adequately. Following your test, one of our dentists looks at your results, makes recommendations, and one of our team members calls you to go over these. Once your symptoms are resolved and your apnea is objectively controlled, you are moved to a maintenance routine schedule to make sure all remains well. If anything comes up between those routine appointments, give our office a call so we can handle it appropriately.
If you ever feel something isn’t feeling right, please give our office a call so we can either troubleshoot over the phone or make an appointment for you to come in. We need to make sure you are comfortable and wearing your appliance all night, every night!
Traveling with your oral appliance is easy! It’s helpful to take and keep your appliance in a small thermos to prevent melting in case it’ll be in warmer temperatures. Be sure to keep it handy on transportation (bus, train, plane, etc.) if you plan on napping! Brush it with soap and cold water just like you do at home.
OASYS HINGE
To advance the appliance you will turn the gear in the direction of the arrow 180 degrees from words on top to words on the bottom. The direction is opposite on each side. If you make an advancement on one side you MUST make an advancement on the other side.
DREAM TAP
To advance the appliance you will have it in your mouth. You will put the hex key in the front hole and toward your right ear, flush to flush.
DORSAL
To advance the appliance you will turn the gear in the direction of the arrow. The direction is opposite on each side. If you make an advancement on one side you MUST make an advancement on the other side.
HERBST
To advance the appliance you will turn the gear in the direction of the arrow. If you make an advancement on one side you MUST make an advancement on the other side.
O2VENT
To advance the appliance you will have it in your mouth. You will put the hex key in the front hole and turn toward your left ear, flush to flush.
PROSOMNUS CA
To advance the appliance you will turn the gear in the direction of the arrow. If you make an advancement on one side you MUST make an advancement on the other side.
TAP 1
To advance the appliance you will have it in your mouth. You will turn the front assembly piece towards your left ear flush to flush.
TAP 3
To advance the appliance you will have it in your mouth. You will put the hex key in the front hole and toward your left ear, flush to flush.
While jaw soreness isn’t common with an oral appliance, it does happen sometimes. Click on the videos below for some exercises you can do to alleviate any soreness you are feeling. If pain persists, please call our office so we can get you comfortable ASAP.
We recommend cleaning your oral appliance daily using foaming soap (e.g. Method foaming soap), a soft-bristled toothbrush, and cold water. Depending on your particular appliance, we also may recommend soaking it in a cleaner during the day. If you have pets, please be sure to keep your appliance in a closed container so they aren’t able to get to it!
Wait at least 30 minutes before using the aligner.
*That time of normal functioning (chewing, speaking, swallowing) will help relax your jaw.
Placing the Aligner
As you are watching in a mirror, you will place the aligner on your lower front teeth and slowly close into it. You are watching to verify that the edges of your upper teeth are fully into place. If there is any gapping from the edge of your teeth to the imprint in the aligner, you will put it away and try it a few hours later.
- If you cannot get into the aligner by the end of the day, leave your appliance out that night if you feel comfortable doing so, and call us in the morning.
- Failure to follow these instructions may result in a bite change that could require orthodontics or even surgery at additional charge to you.
The reason we do Home Sleep Tests is to make sure your custom oral appliance is controlling your apnea adequately. Following your test, one of our dentists looks at your results, makes recommendations, and one of our team members calls you to go over these. Once your symptoms are resolved and your apnea is objectively controlled, you are moved to a maintenance routine schedule to make sure all remains well. If anything comes up between those routine appointments, give our office a call so we can handle it appropriately.
If you ever feel something isn’t feeling right, please give our office a call so we can either troubleshoot over the phone or make an appointment for you to come in. We need to make sure you are comfortable and wearing your appliance all night, every night!
Traveling with your oral appliance is easy! It’s helpful to take and keep your appliance in a small thermos to prevent melting in case it’ll be in warmer temperatures. Be sure to keep it handy on transportation (bus, train, plane, etc.) if you plan on napping! Brush it with soap and cold water just like you do at home.
OASYS HINGE
To advance the appliance you will turn the gear in the direction of the arrow 180 degrees from words on top to words on the bottom. The direction is opposite on each side. If you make an advancement on one side you MUST make an advancement on the other side.
DREAM TAP
To advance the appliance you will have it in your mouth. You will put the hex key in the front hole and toward your right ear, flush to flush.
DORSAL
To advance the appliance you will turn the gear in the direction of the arrow. The direction is opposite on each side. If you make an advancement on one side you MUST make an advancement on the other side.
HERBST
To advance the appliance you will turn the gear in the direction of the arrow. If you make an advancement on one side you MUST make an advancement on the other side.
O2VENT
To advance the appliance you will have it in your mouth. You will put the hex key in the front hole and turn toward your left ear, flush to flush.
PROSOMNUS CA
To advance the appliance you will turn the gear in the direction of the arrow. If you make an advancement on one side you MUST make an advancement on the other side.
TAP 1
To advance the appliance you will have it in your mouth. You will turn the front assembly piece towards your left ear flush to flush.
TAP 3
To advance the appliance you will have it in your mouth. You will put the hex key in the front hole and toward your left ear, flush to flush.
While jaw soreness isn’t common with an oral appliance, it does happen sometimes. Click on the videos below for some exercises you can do to alleviate any soreness you are feeling. If pain persists, please call our office so we can get you comfortable ASAP.
Step-by-Step Guide to Setting Up Your Home Sleep Test
Setting up your home sleep test is simple. Just follow these steps to stay comfortable while we collect the data needed for an accurate assessment of your sleep health:
- Prepare the Belt: Wrap the belt around your chest over a T-shirt or tank top and fasten the clip securely.
- Attach the Wire: Plug the loose wire into the belt’s slot. To reduce tangling, thread it through your shirt collar and down an arm.
- Fit the Finger Probe: Slide the finger probe onto the ring finger of your non-dominant hand so the raised bump sits over your fingernail. Remove any rings or nail polish, and use the provided tape to keep the probe snug.
- Secure the Wires: Tape the wire around your wrist or arm to keep it from moving during sleep.
- Insert the Nasal Cannula: If not already attached, screw the cannula in place. Position the rubber prongs so they curve toward your nostrils, loop them around both ears, and tighten the rubber stop near your chin. For extra security, place a small piece of tape on your cheeks.
- Ready for Bed: Once everything is set, simply go to sleep. The test will start automatically at the scheduled time, letting you rest as usual while the device collects essential data.
By following these steps, you’ll help us perform a thorough evaluation of your sleep health right from your own bed, ensuring a smoother path to a better night’s rest.